# Add Chat Widget to Power Pages - Proactive Chat

In exploring the Chat channel in OmniChannel functionality, as in this article, I will note how to add the Chat Widget to Power Pages and enable Proactive Chat for this page.

<figure><img src="/files/2jLKQJyV4Pc8tC8kpsqp" alt=""><figcaption></figcaption></figure>

## Add "Chat Widget" to Power Pages

Firstly, You must create the [Power Pages](https://learn.microsoft.com/en-us/power-pages/getting-started/create-manage) site.&#x20;

After that, open the Power Page Management application to begin configuration.

| Open Power Page Management Apps                                     | Path                                                                                          |
| ------------------------------------------------------------------- | --------------------------------------------------------------------------------------------- |
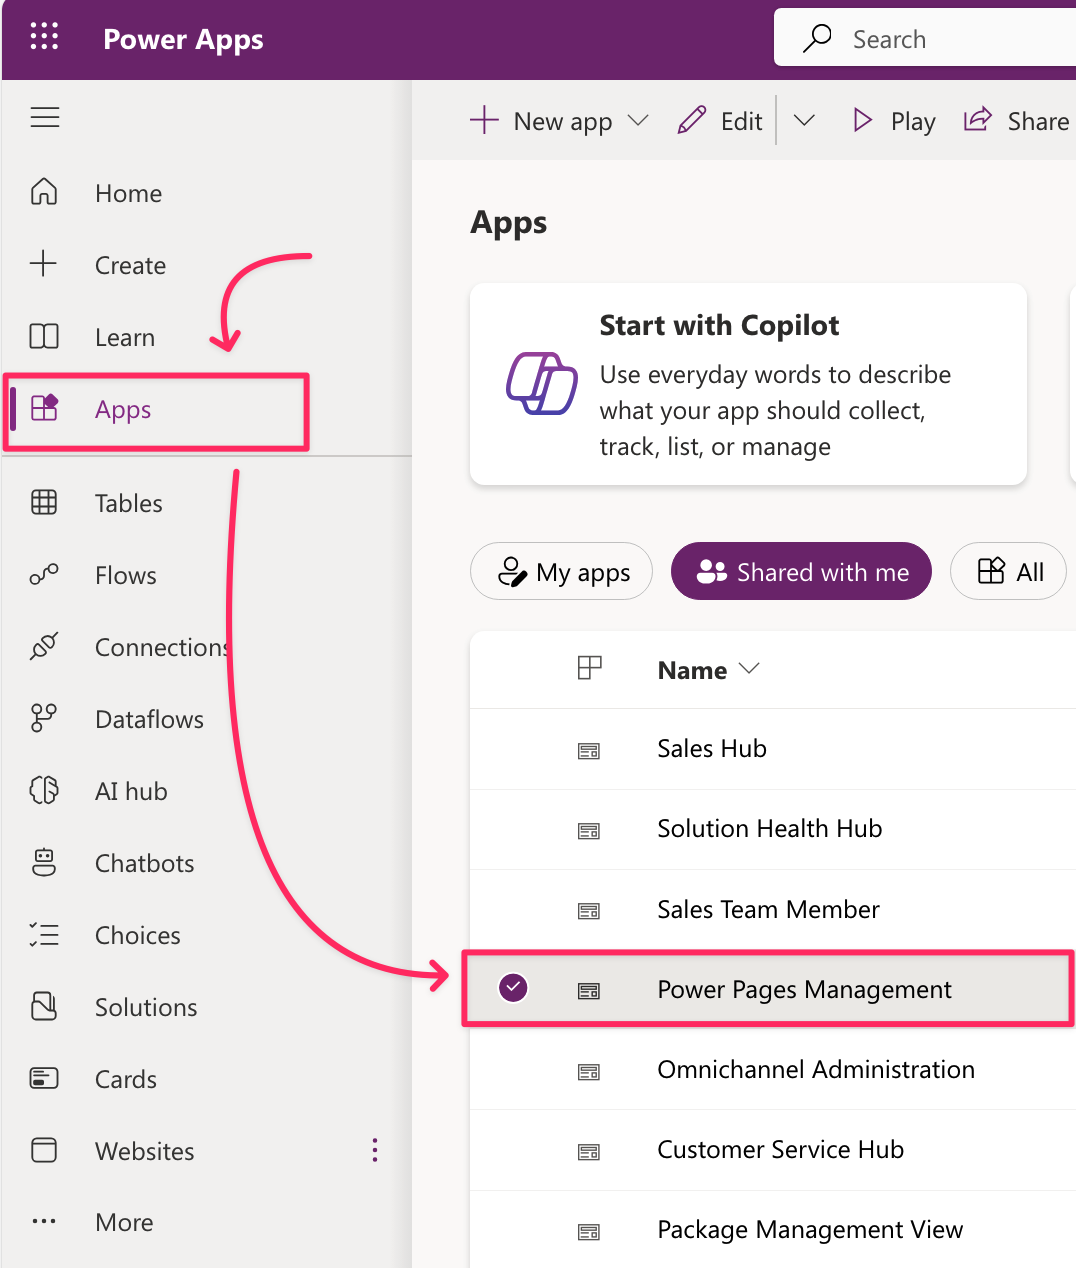
| <img src="/files/OysvPo8hp2daMS40OrLM" alt="" data-size="original"> | In Power Apps Studio > select Apps > then click open **Power Pages Management** application   |
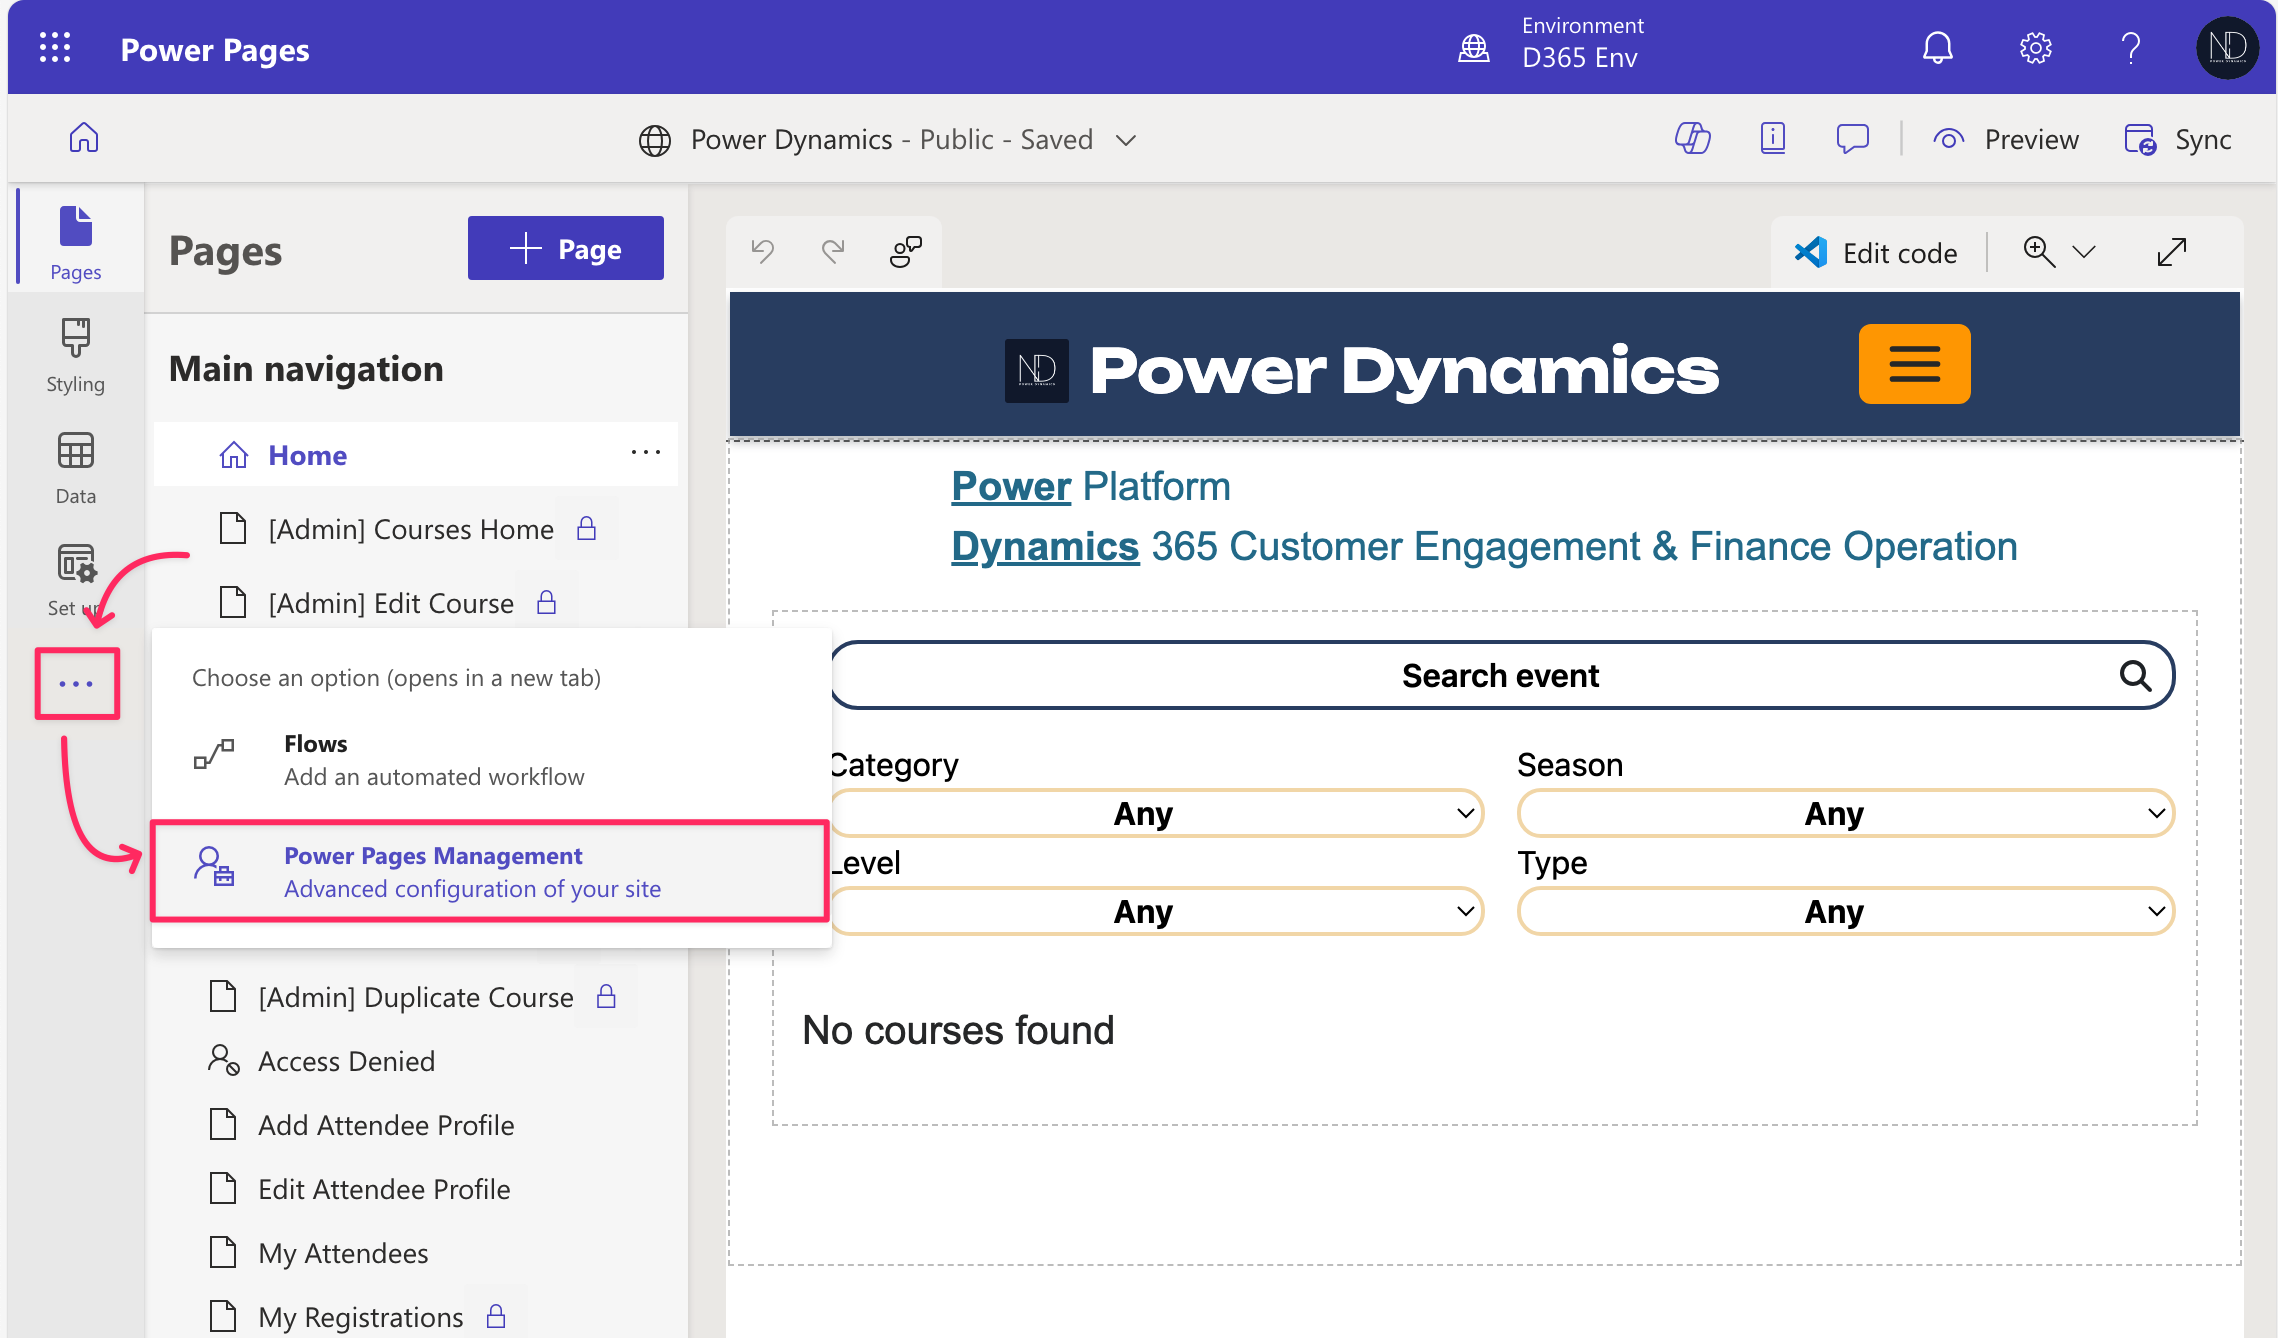
| <img src="/files/RDAvejzFQJW59aC5kjU7" alt="" data-size="original"> | In the Power Pages site editor > select **<...>** icon then click **Power Pages Management.** |
In the Power Pages Management application >> go to the **Content** subarea >> select the **Code Snippets** under for configuration.

After that, you just copy the [Chat Widget's code snippet](https://dyns.ntd.asia/power-dynamics/d365-ce/customer-experience/omnichannel/internal-live-chat-in-mda#create-a-live-chat-channel) and then paste it to the **Value (HTML)** as below.
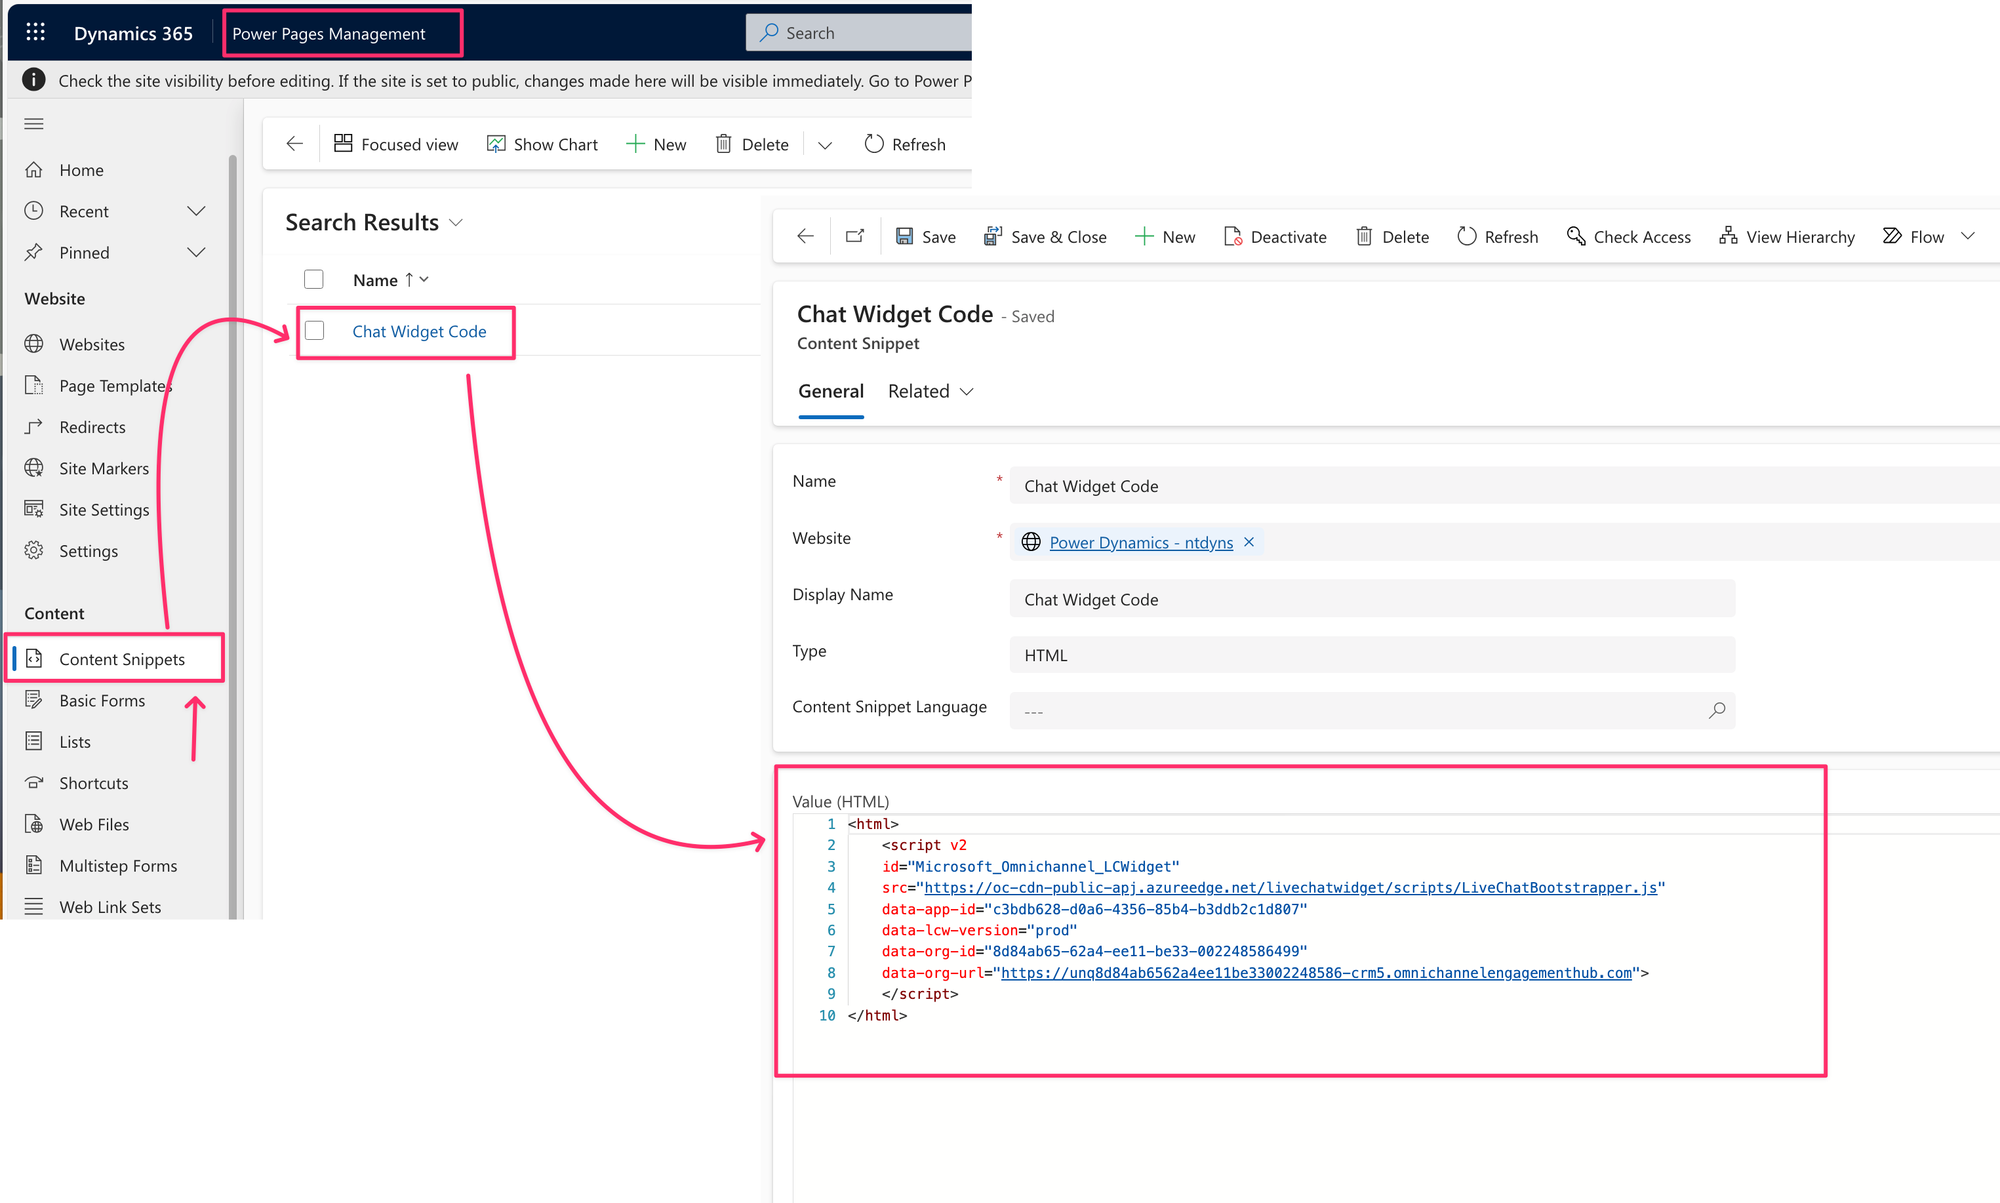
<figure><img src="/files/o9boZmmczgmiLoY205Yp" alt=""><figcaption><p>Add HTML of Chat Widget snippet code</p></figcaption></figure>

Now testing...

<figure><img src="/files/JbpHnSE8hfxT5ZUsYPUR" alt=""><figcaption><p>Chat Widget - Testing</p></figcaption></figure>

## Proactive Chat

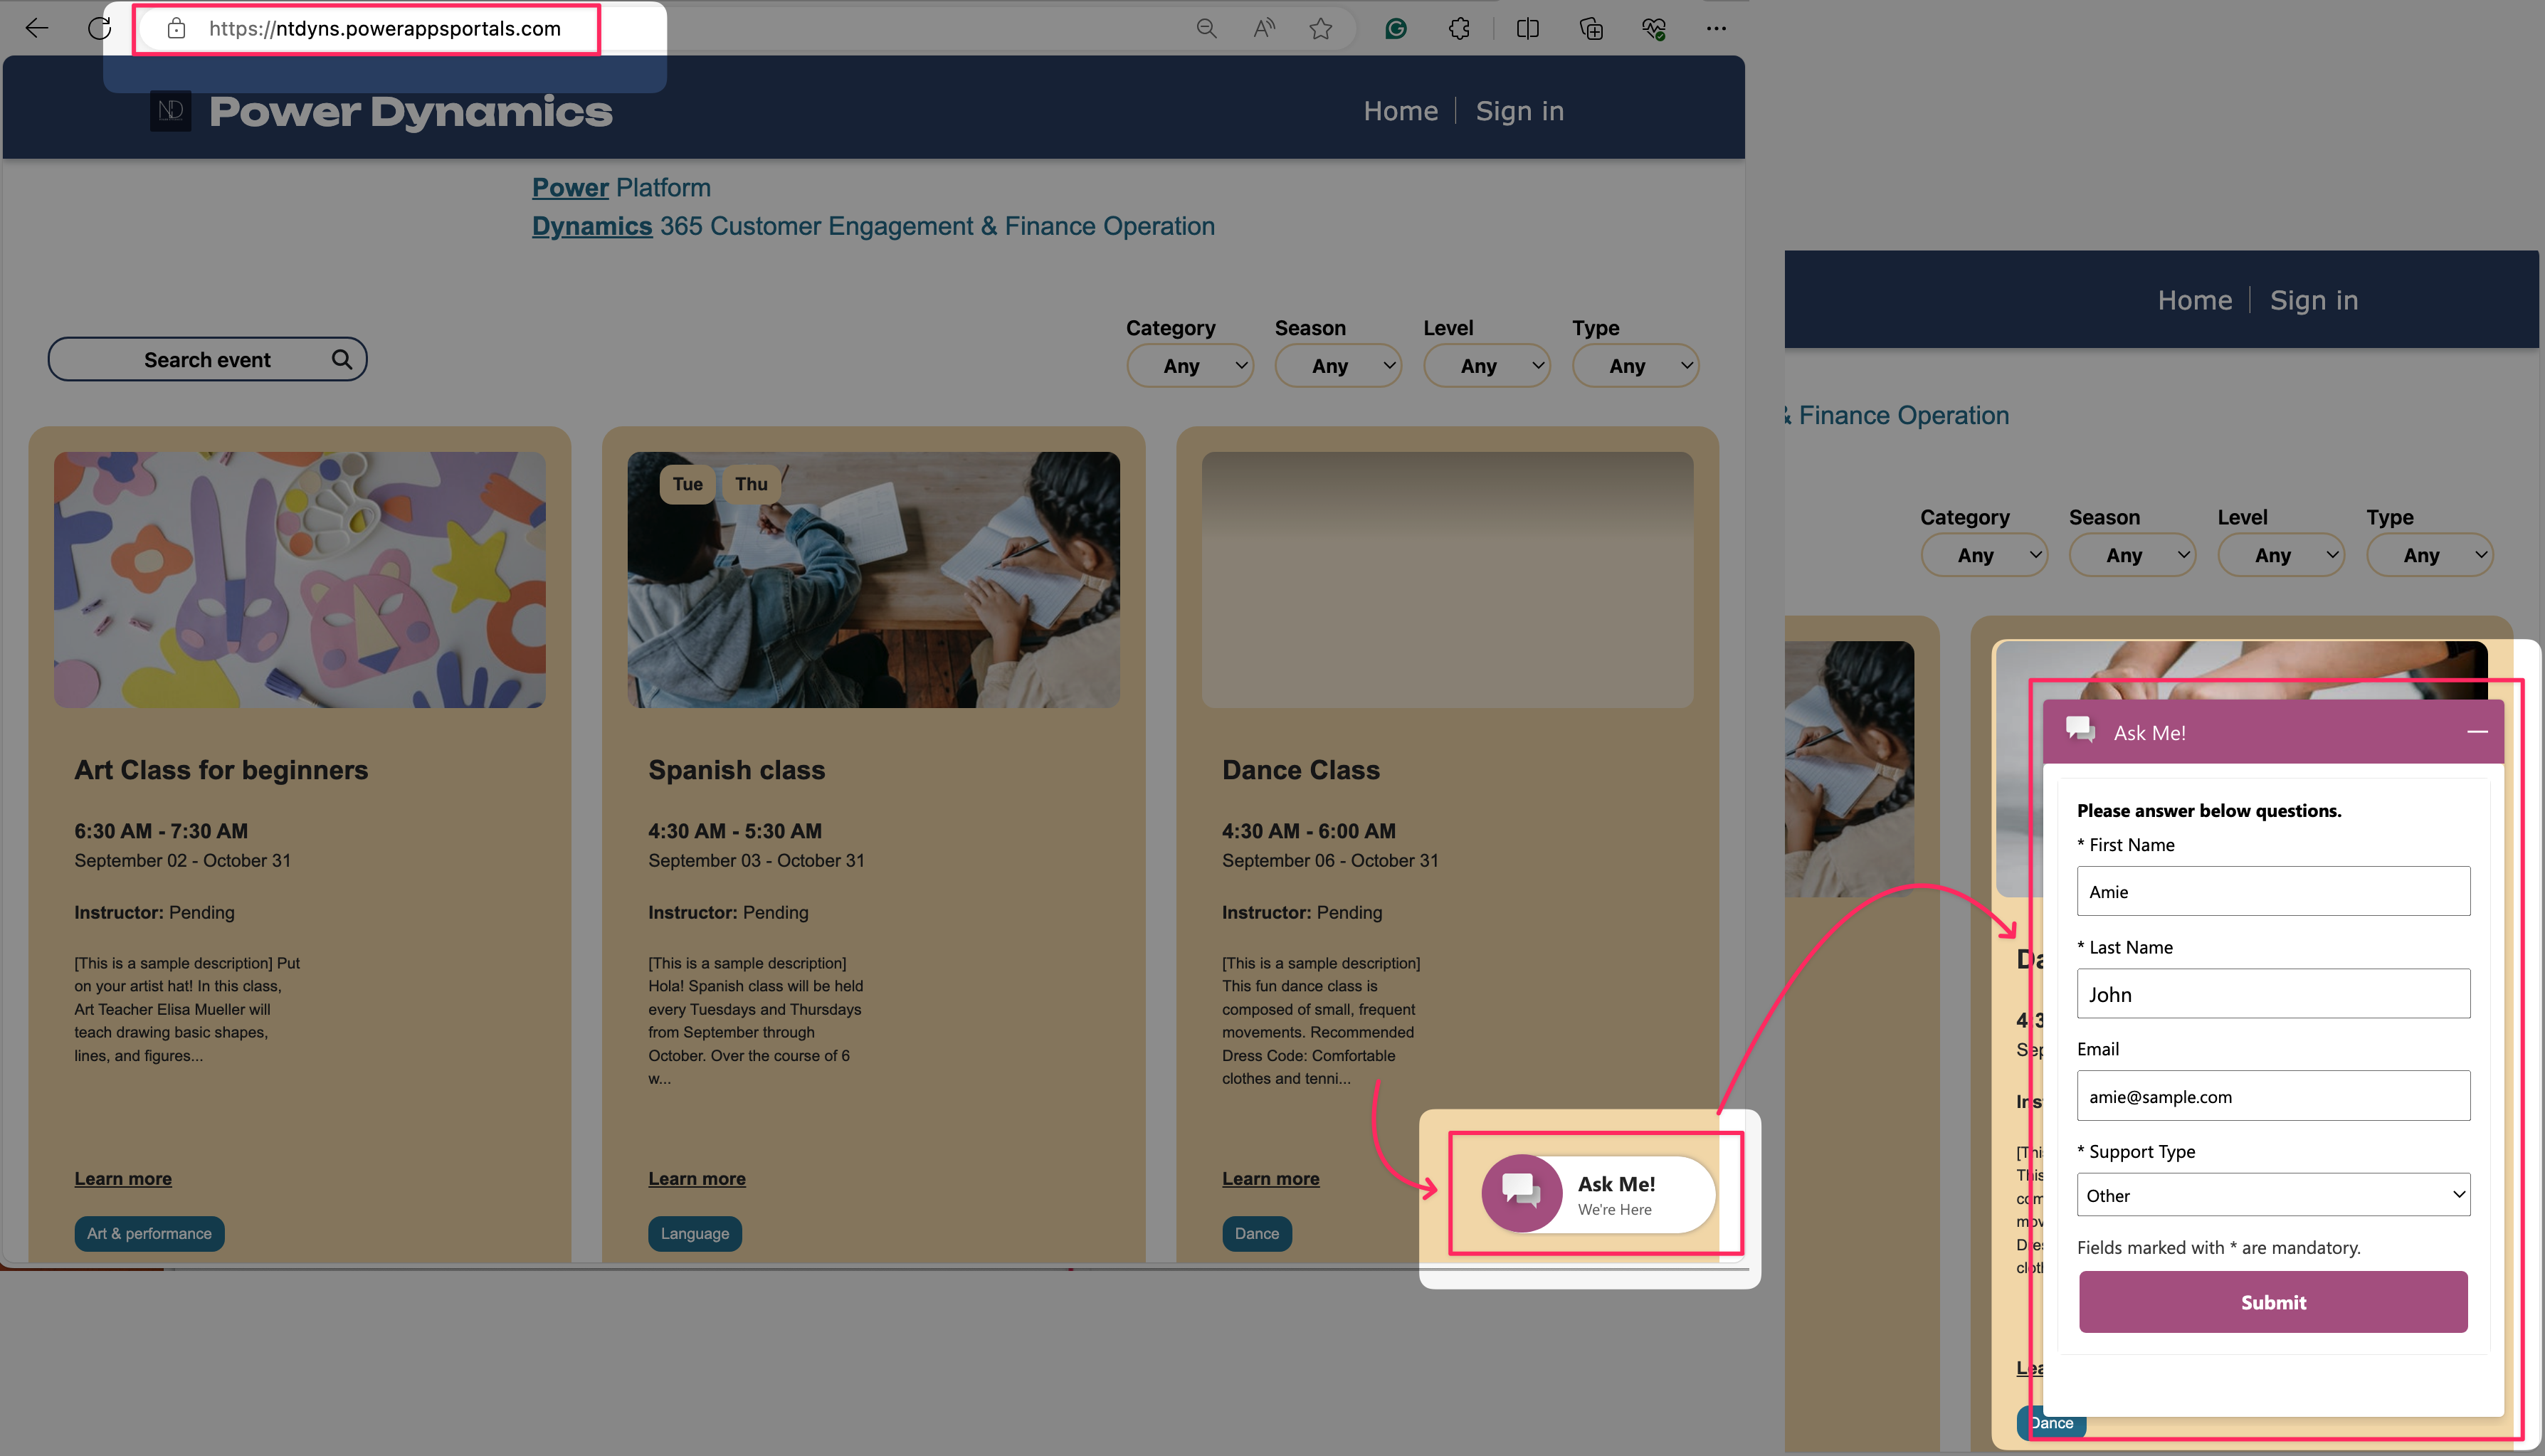
The D365 Omnichannel for Customer Service allows showing the Live Chat widgets to customers. A chat channel allows your customers to engage with customer service agents using the chat widget on a website. However, You have thought that instead of waiting for them to initiate, we can invite them to a chat conversation proactively.&#x20;

<mark style="color:blue;">**For instance,**</mark> <mark style="color:blue;"></mark><mark style="color:blue;">identifying when a</mark> <mark style="color:blue;"></mark><mark style="color:blue;">**customer has lingered on a specific page**</mark> <mark style="color:blue;"></mark><mark style="color:blue;">for an extended period could be a prime opportunity to prompt engagement with agents via web chat</mark><mark style="color:blue;">**.**</mark>

Okay... now I will drop my configuration as below.

### 1. Enable the Proactive Chat feature for "Chat" channel

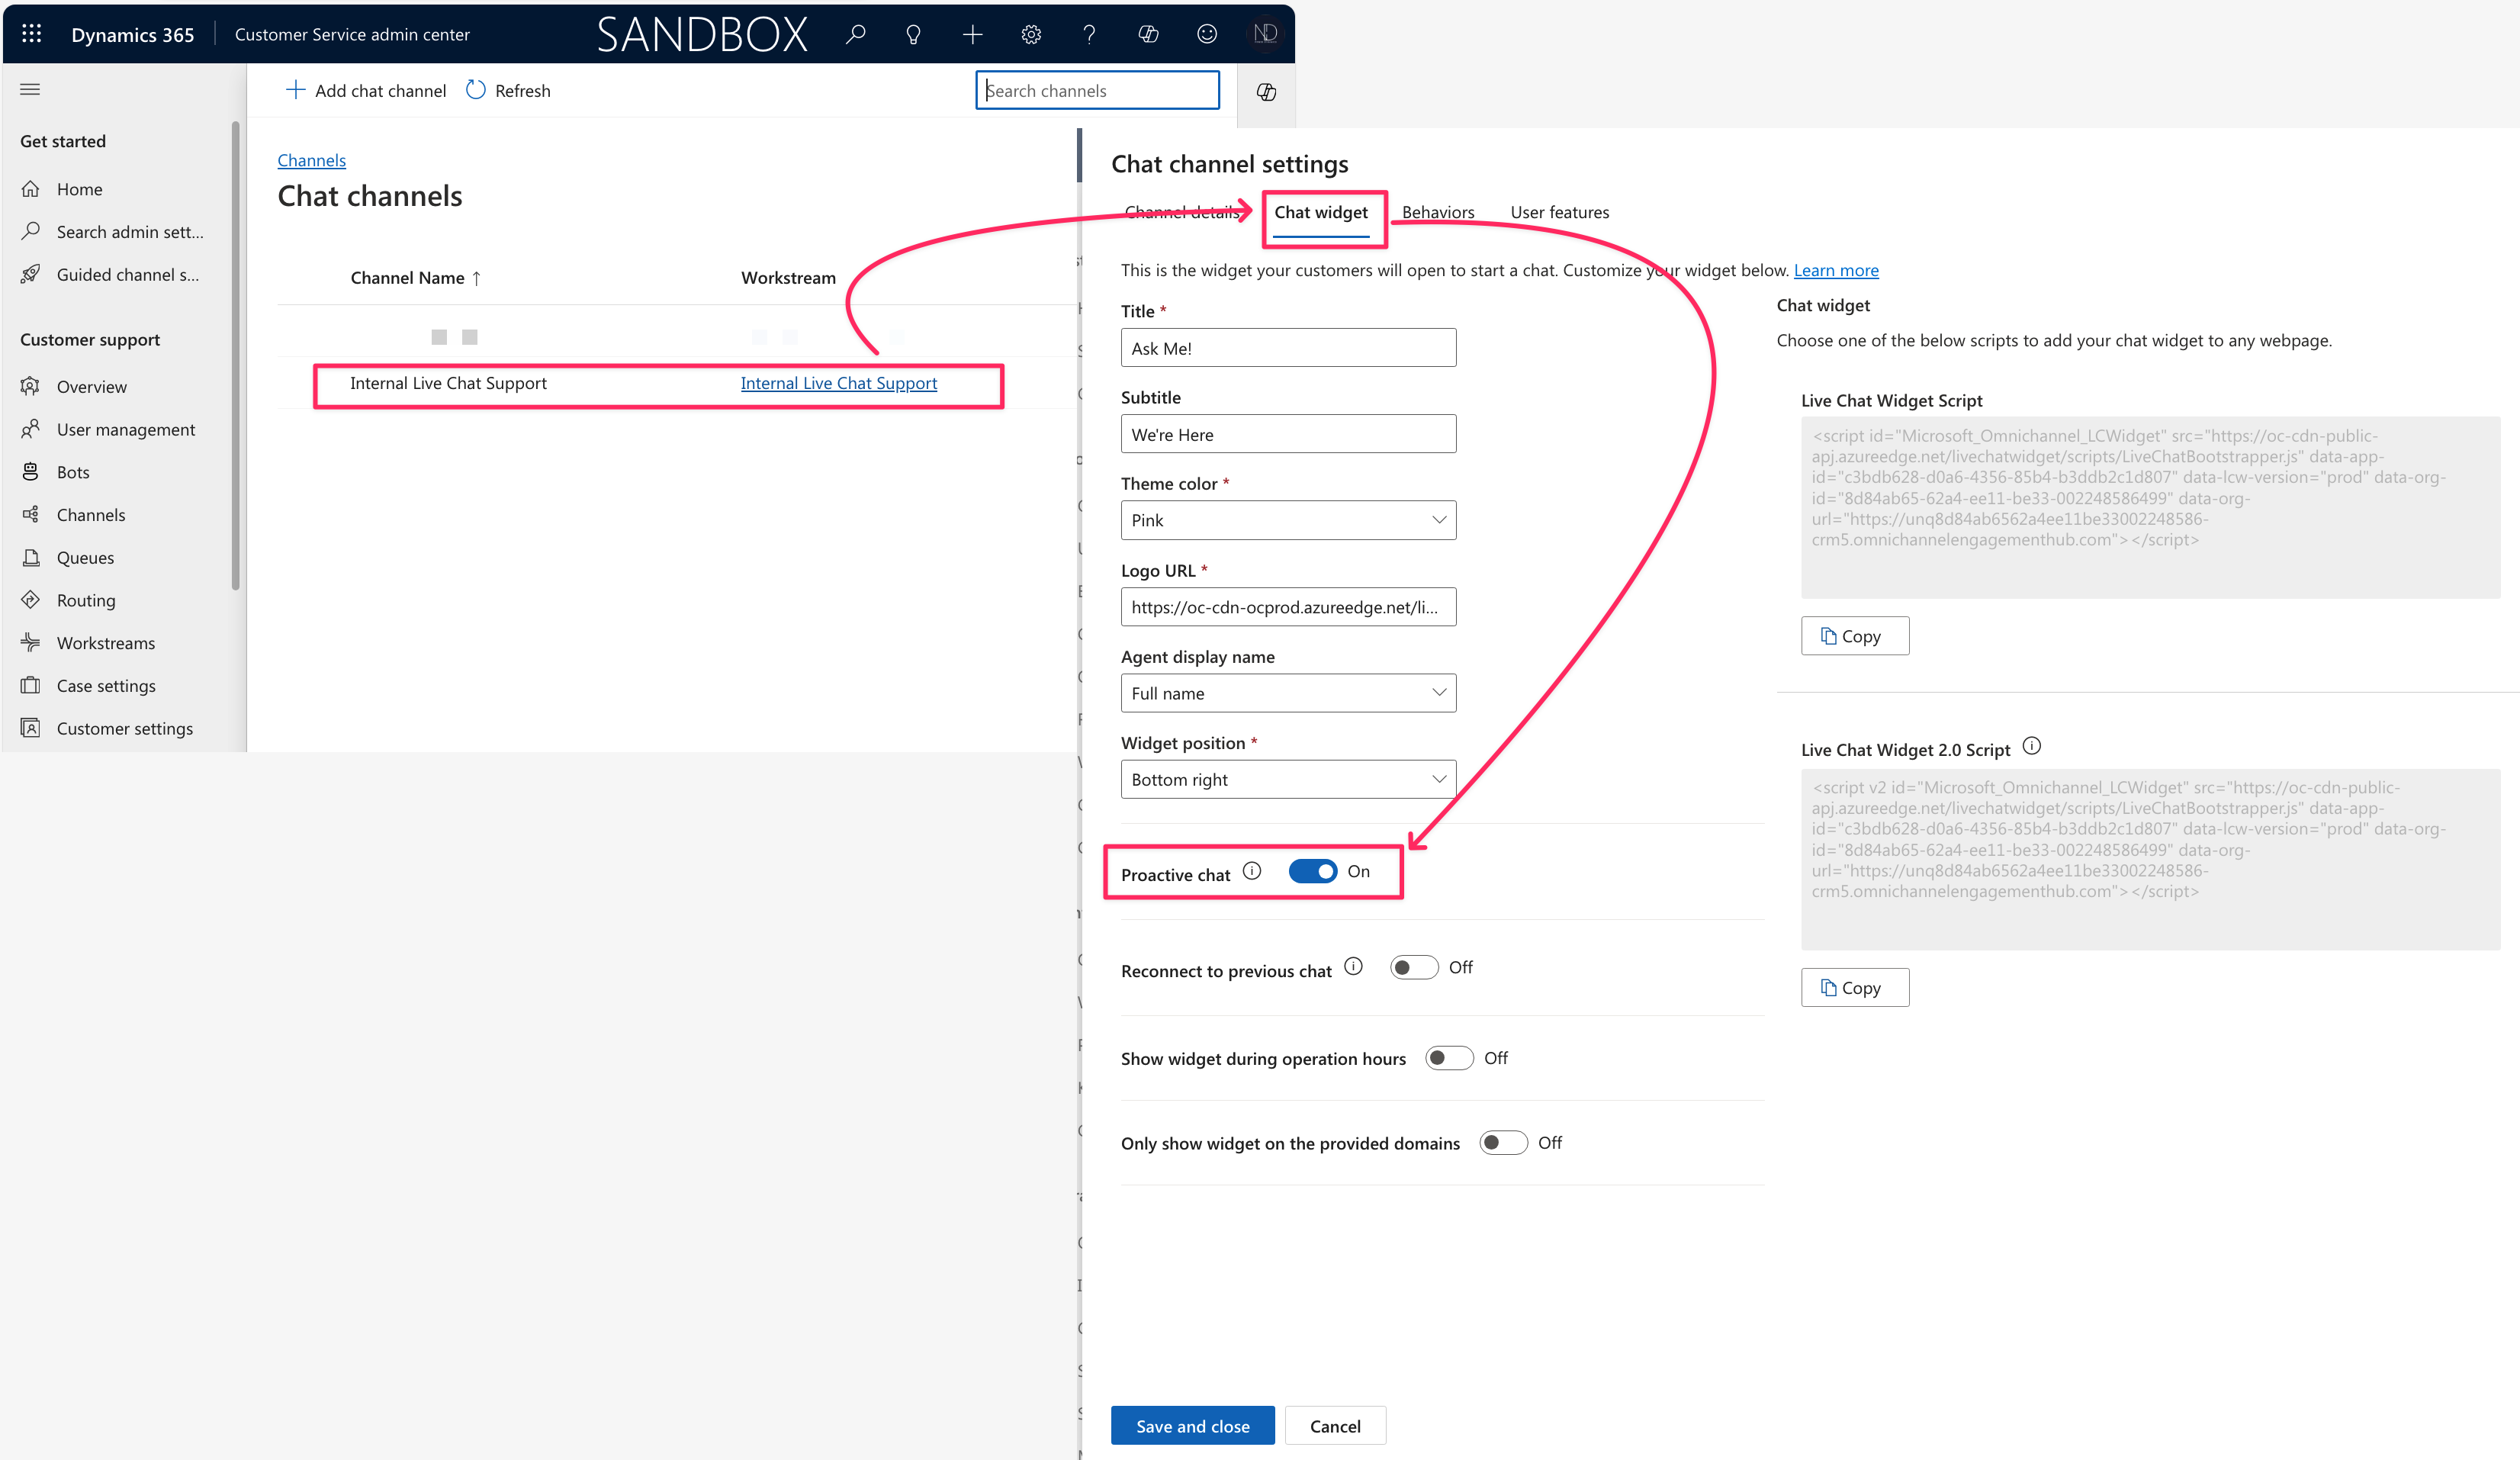
Open **Customer Service Admin** > select **Channel** > select **Chat** and click manage. Then open the live chat channel, and enable **Proactive chat** at the **Chat widget** tab as below.

<figure><img src="/files/9GGhTDMiN13aXIFL9ULt" alt=""><figcaption><p>Enabling Proactive Chat for Chat channel</p></figcaption></figure>

### 2. Inject the HTML code for Proactive Chat configuration on your page

First, we must access this Microsoft [Link](https://learn.microsoft.com/en-gb/dynamics365/customer-service/develop/start-proactive-chat) to get the sample code for the **Proactive Chat** configuration.

For my instance, I will use the sample code of [**Scenario 1: Customer wait time**](https://learn.microsoft.com/en-gb/dynamics365/customer-service/develop/start-proactive-chat#scenario-1-customer-wait-time)**.**

{% code lineNumbers="true" %}

```html
// Scenario 1: Customer wait time
<!-- Code to show proactive chat invite after visitor has spend given time on the webpage -->
<script id="Proactivechattrigger">
	// Wait for Chat widget to load completely
    window.addEventListener("lcw:ready", function handleLivechatReadyEvent(){
		var timeToWaitBeforeOfferingProactiveChatInMilliseconds = 20000;
		     //time to wait before Offering proactive chat to webpage visitor
		// Setting context variables
        Microsoft.Omnichannel.LiveChatWidget.SDK.setContextProvider(function contextProvider(){
            return {
                'Proactive Chat':{'value':'True','isDisplayable':true},
                'Time On Page':{'value': timeToWaitBeforeOfferingProactiveChatInMilliseconds ,'isDisplayable':true},
                'Page URL':{'value': window.location.href,'isDisplayable':true},
            };
        });
		
		//Display proactive chat invite after 'timeToWaitBeforeOfferingProactiveChatInMilliseconds' milliseconds
        setTimeout(function(){
            Microsoft.Omnichannel.LiveChatWidget.SDK.startProactiveChat({message: "Hi! Just checking in to see if I can help answer any questions you may have."}, false)
        },timeToWaitBeforeOfferingProactiveChatInMilliseconds);
    });
</script>
```

{% endcode %}

**Follow the steps:**

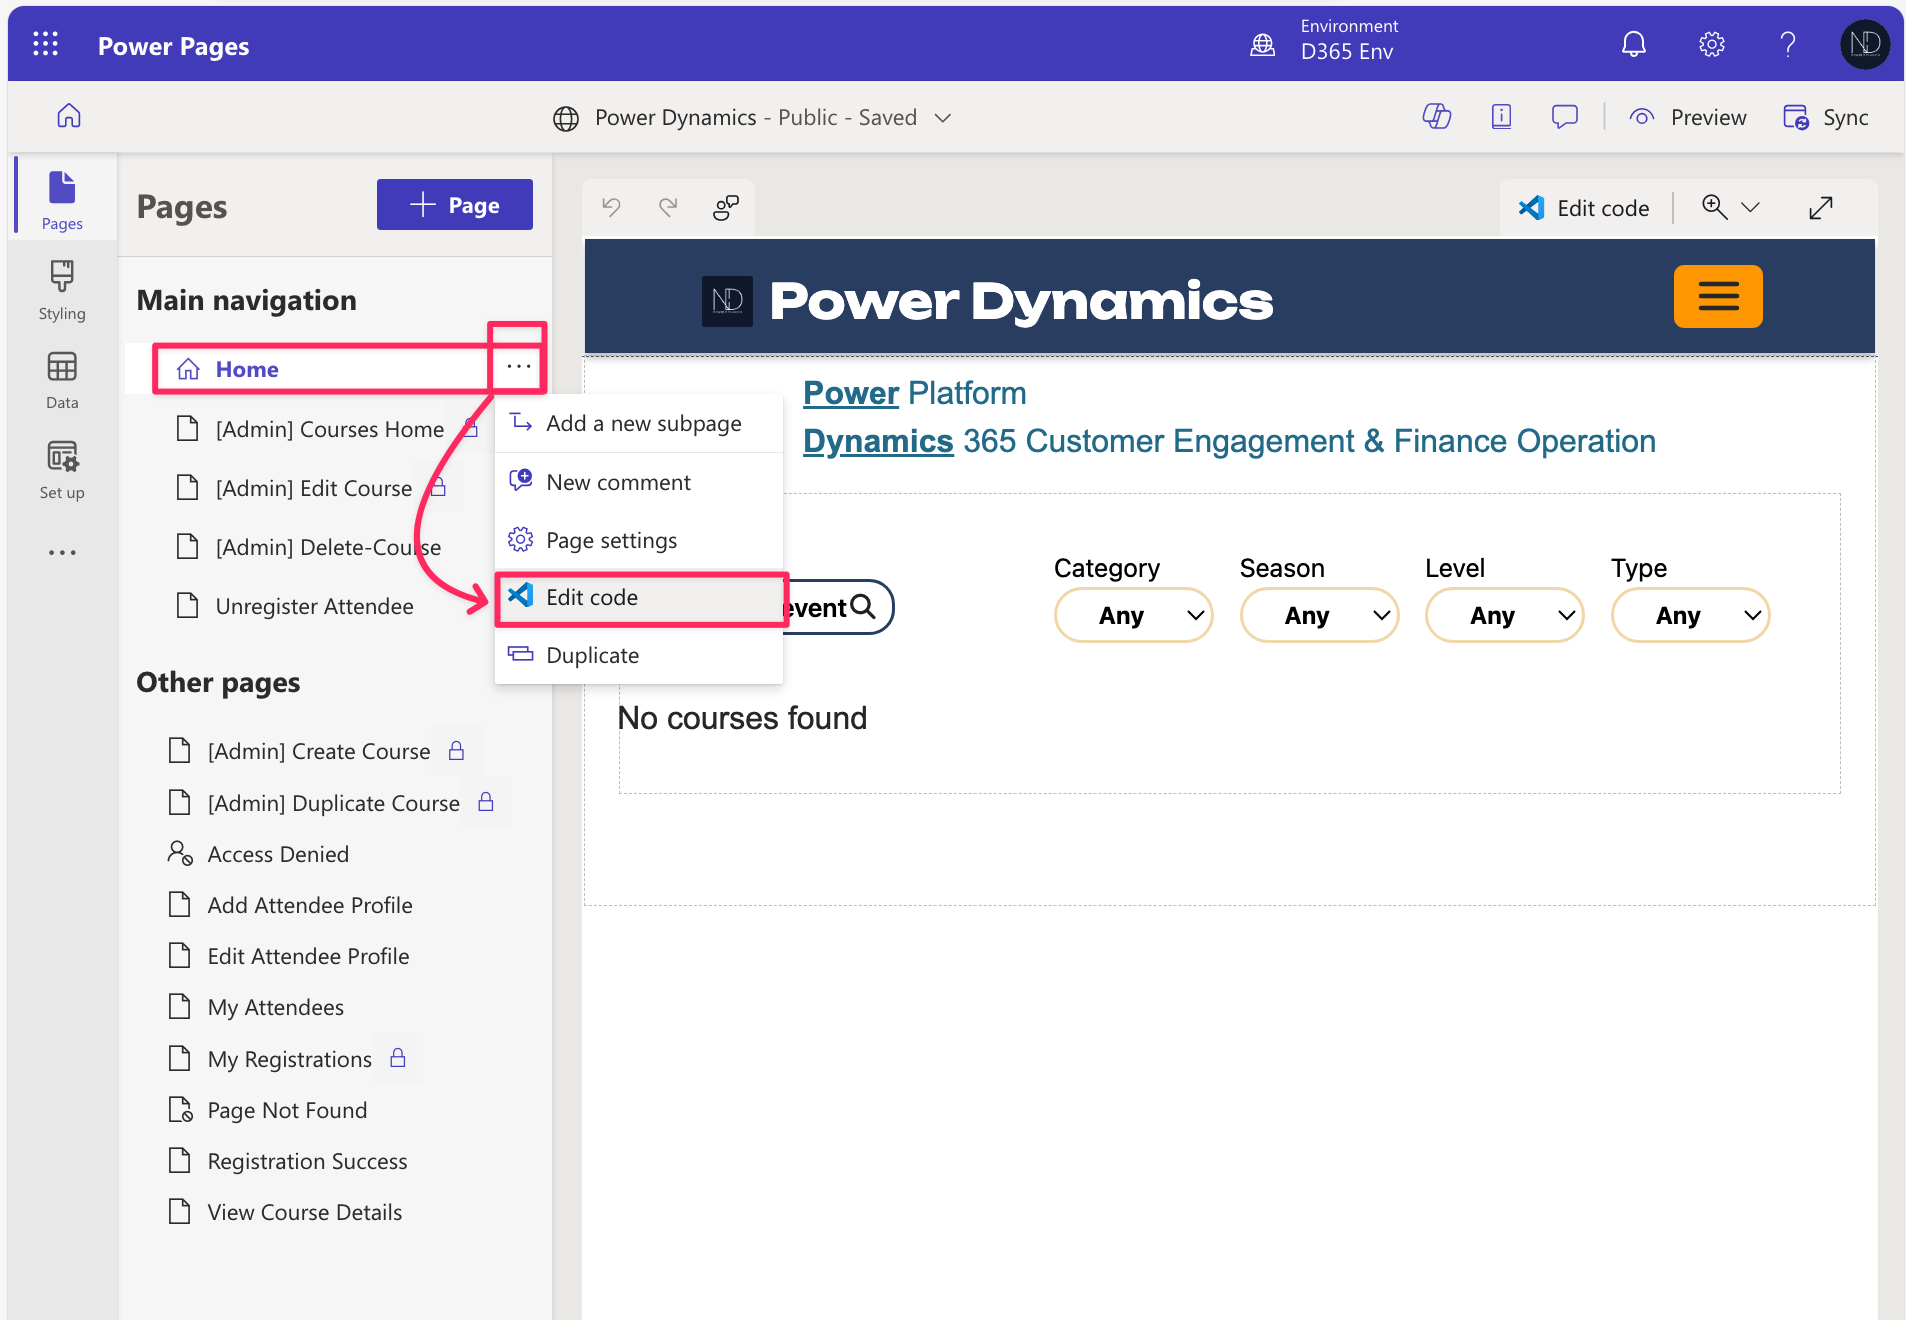
Now, in the Power Pages Studio, on your **Page** on which **you had configured the "Live Chat Widget"** >> click the **\<Edit code>.**  The Power Pages code will be loaded in the Visual Studio Code on the web in the new tab.

My sample: I configured the Live Chat Widget on the **Home page**. So, I will input the proactive chat code for this page.&#x20;

<figure><img src="/files/I5ey2roMEzBhhTiIbPAH" alt=""><figcaption><p>Edit cod on Visual Studio Code</p></figcaption></figure>

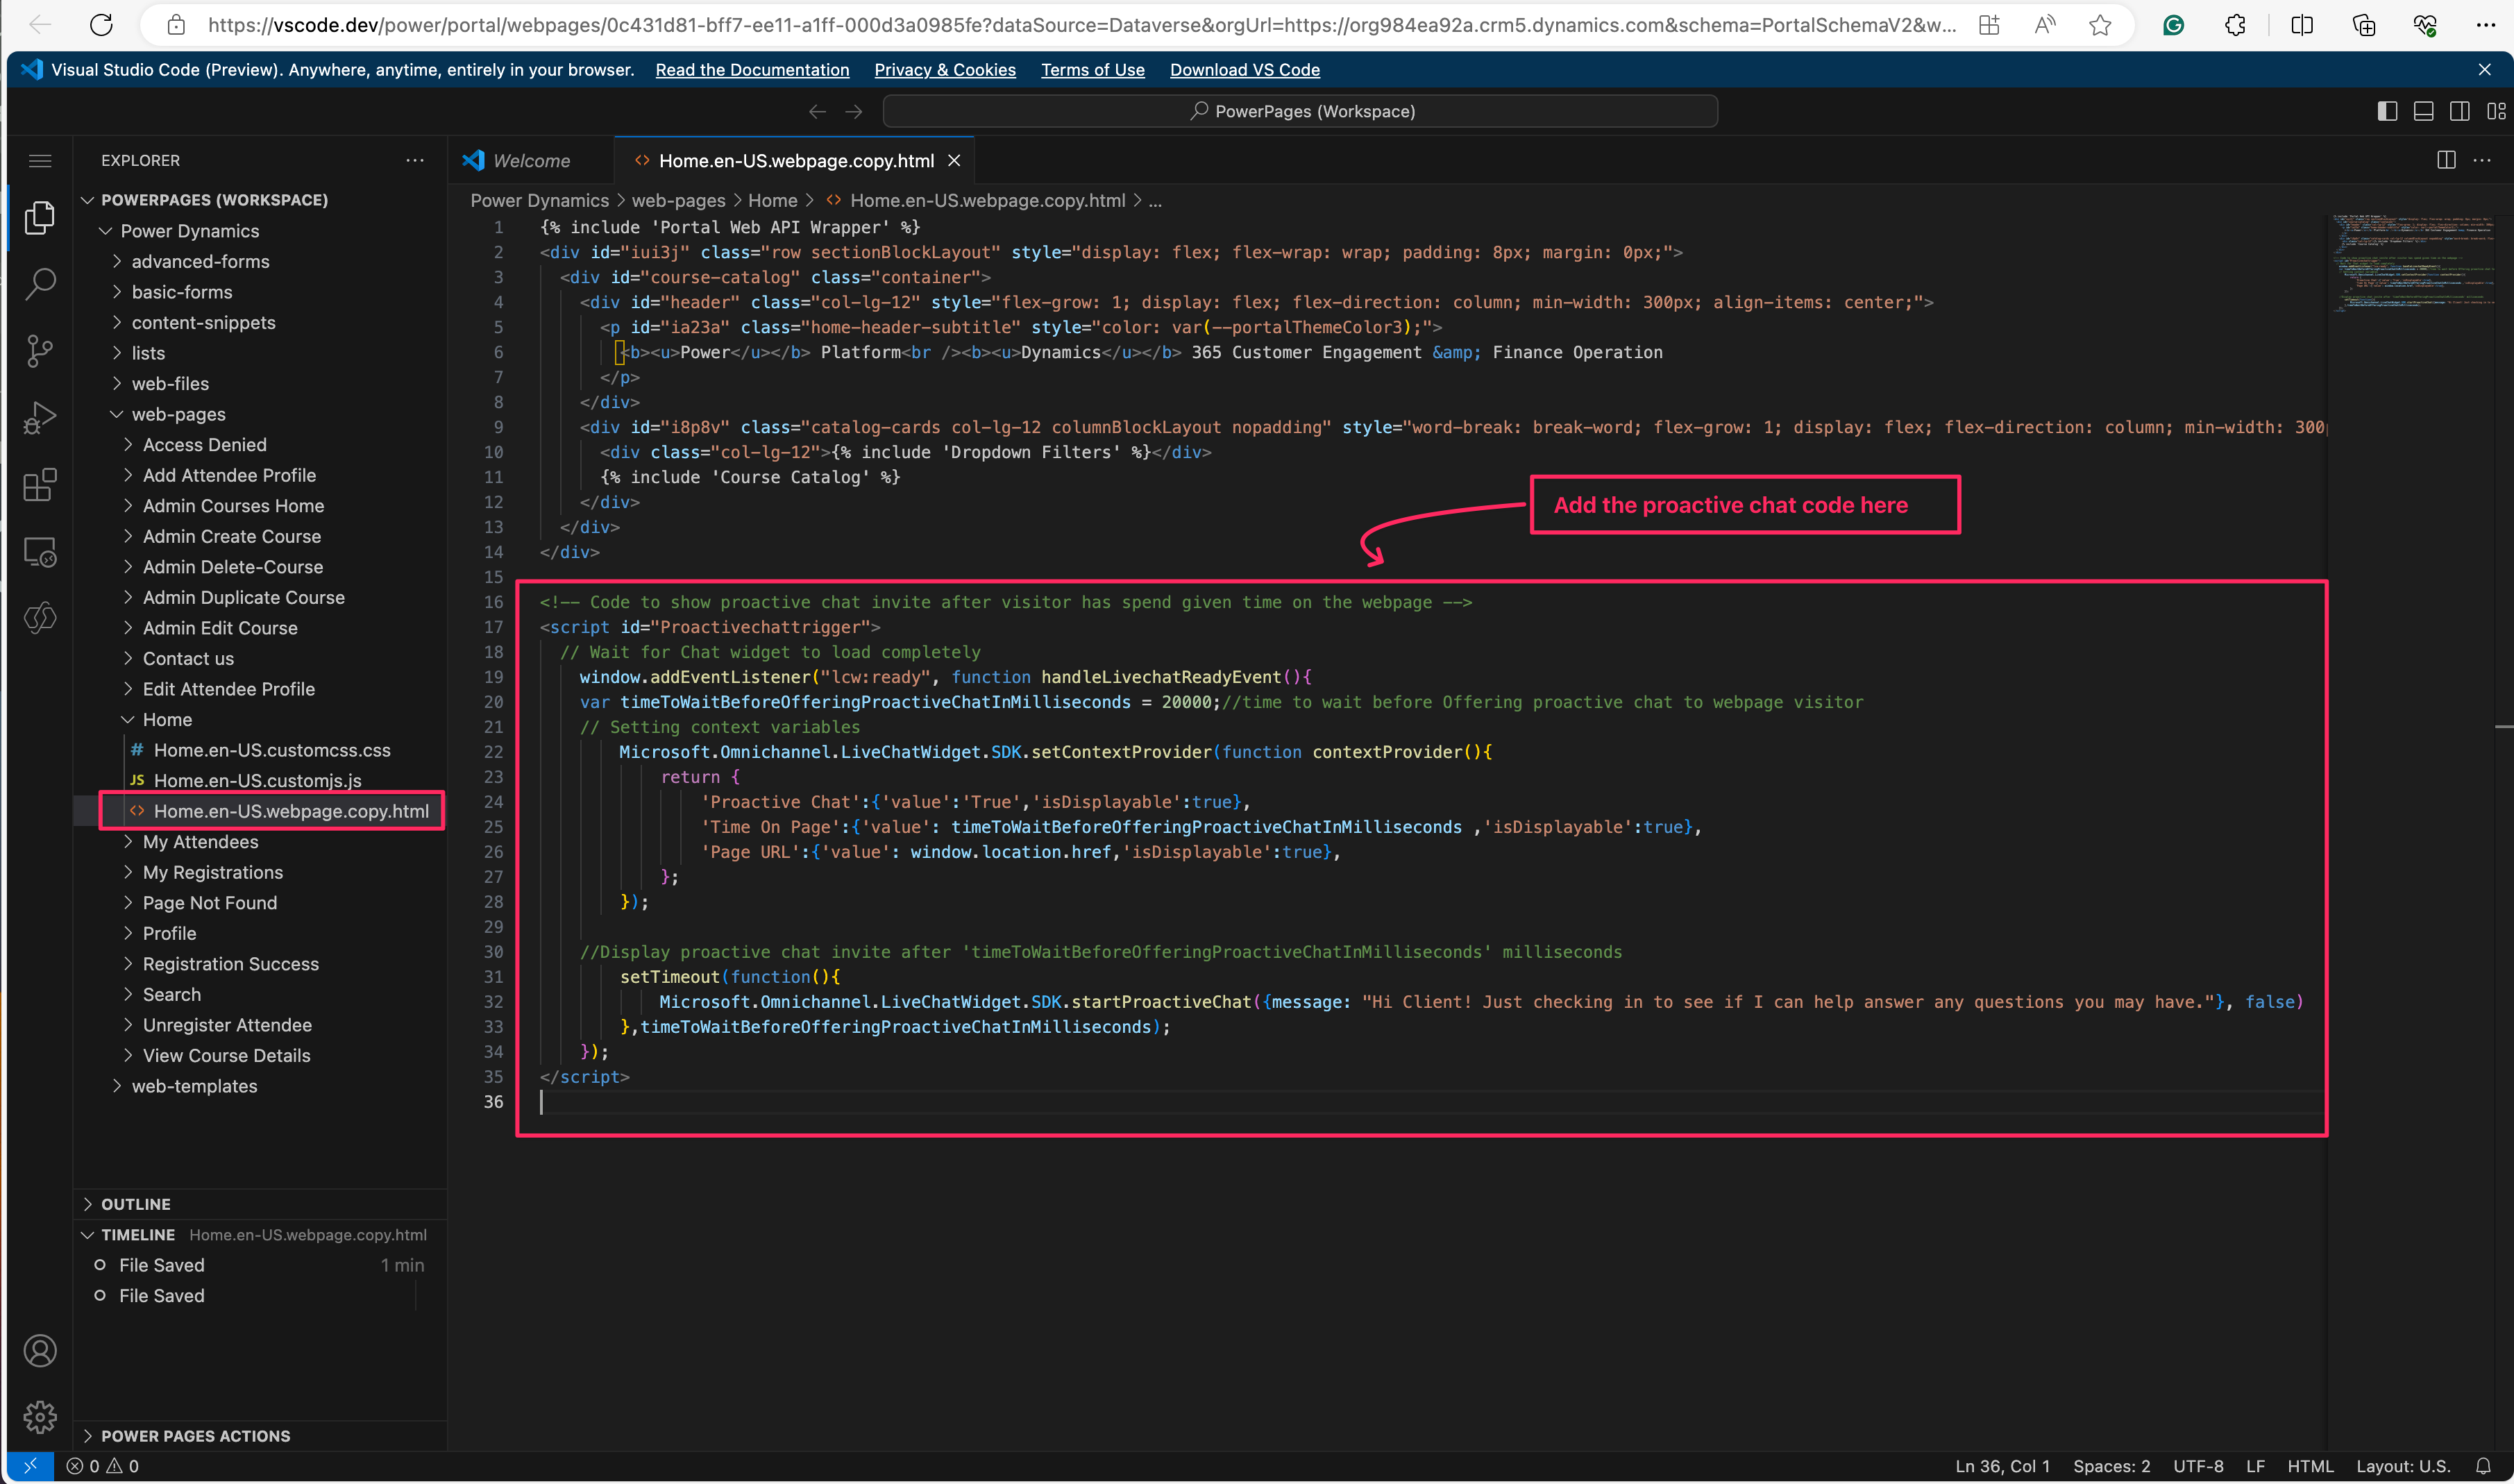
... then input the sample code on the page's HTML file and Save. (using browser shortcut to save file).

<figure><img src="/files/wV4VI09hAlqMb0l9sJnQ" alt=""><figcaption><p>Input the proactive chat sample code</p></figcaption></figure>

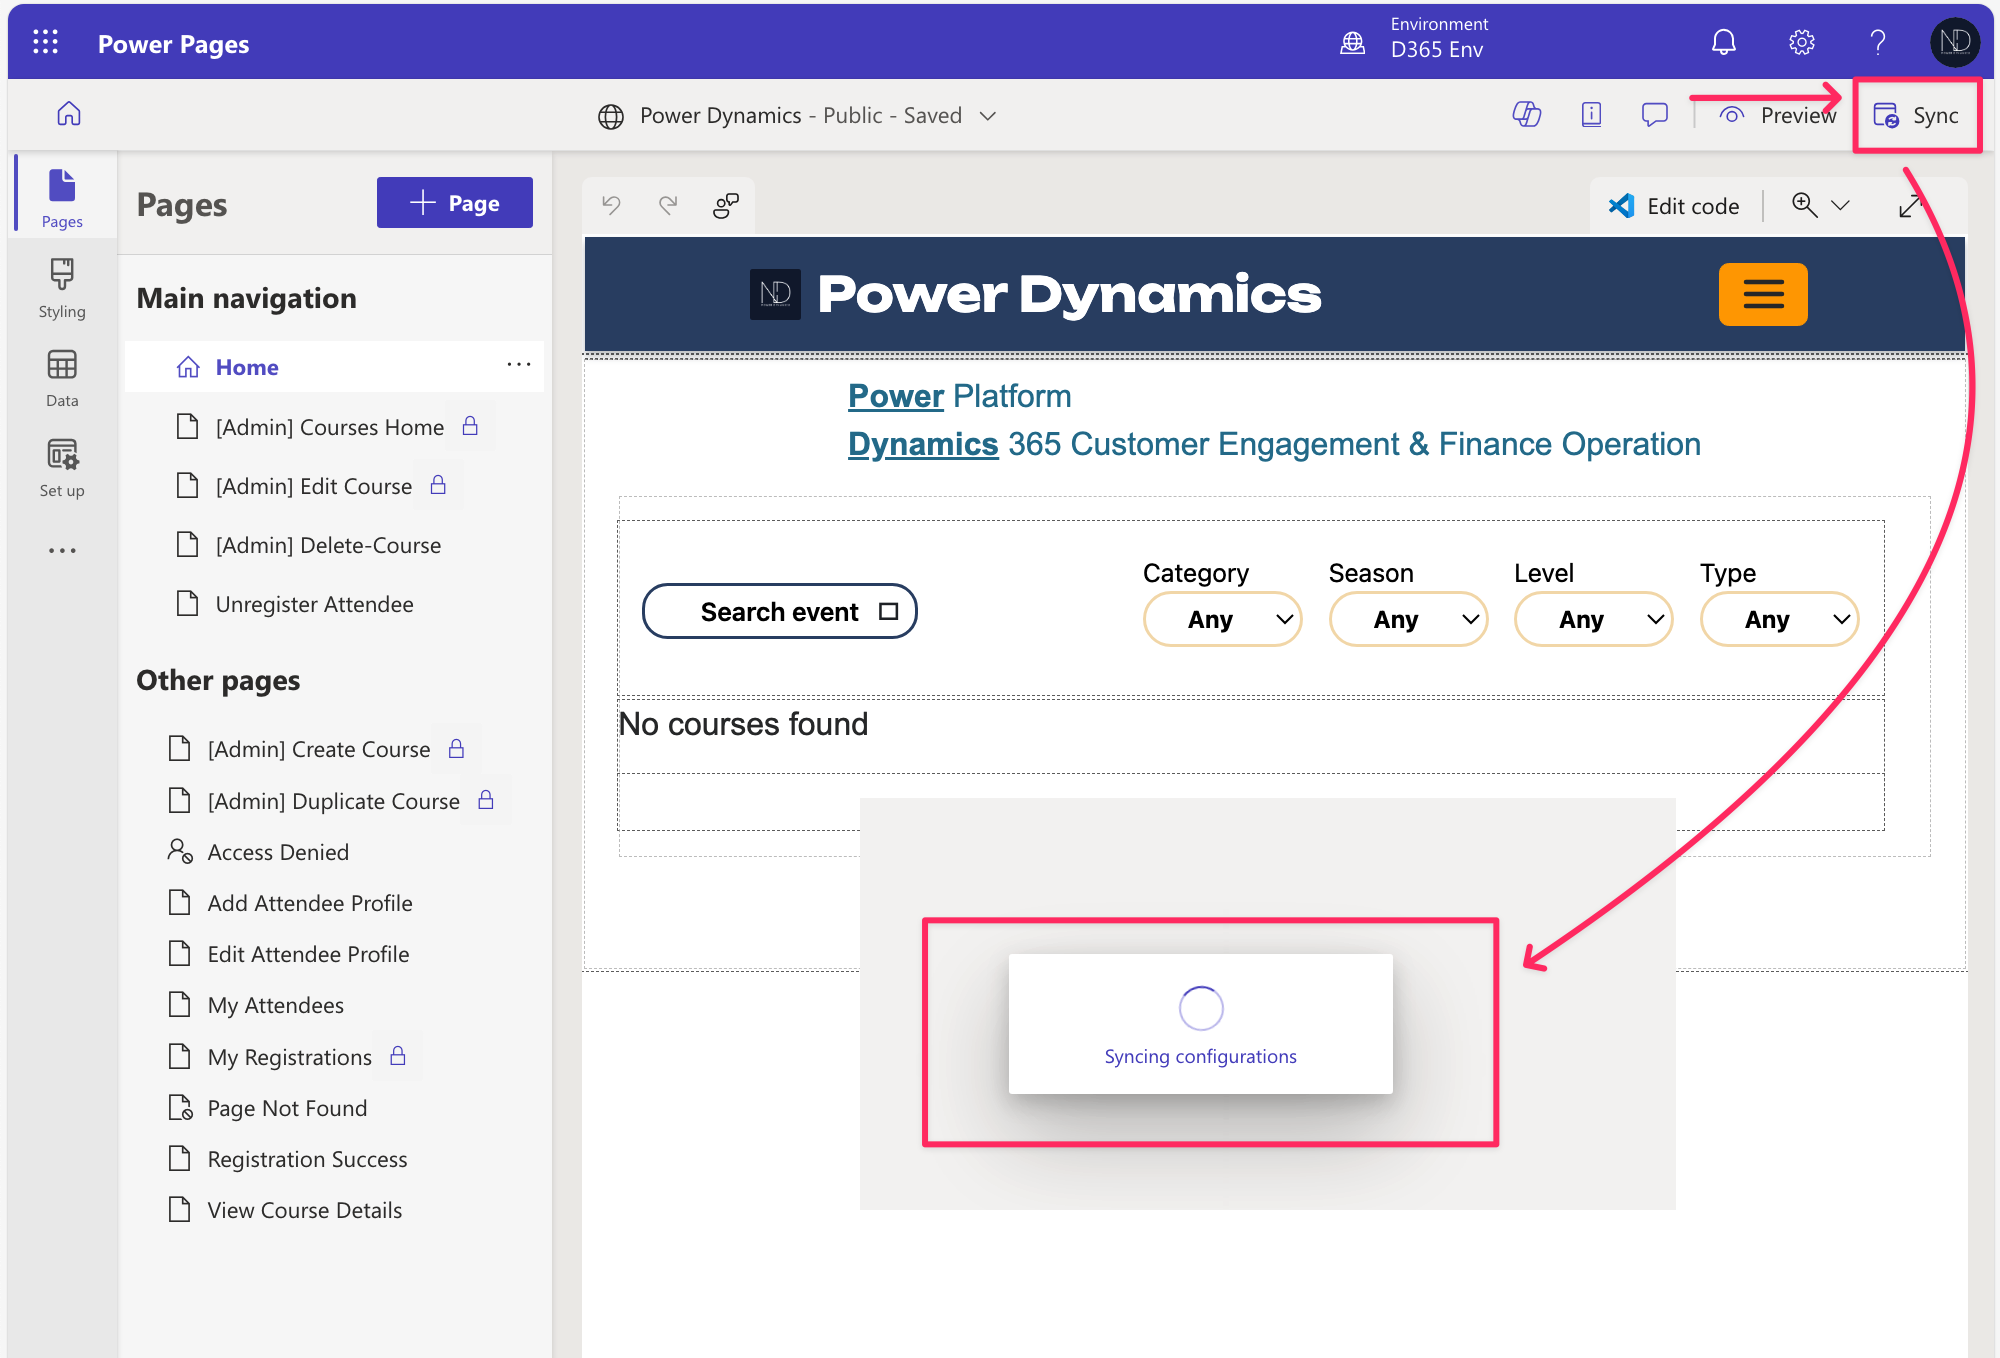
After input, back to the Power Page Studio then click the <**Sync>** button to synchronize the code from Visual Studio code.

<figure><img src="/files/t2ZRTJgwKMQ5702ewPc6" alt=""><figcaption><p>Sync latest code for Power Page</p></figcaption></figure>

### 3. Testing Proactive chat...

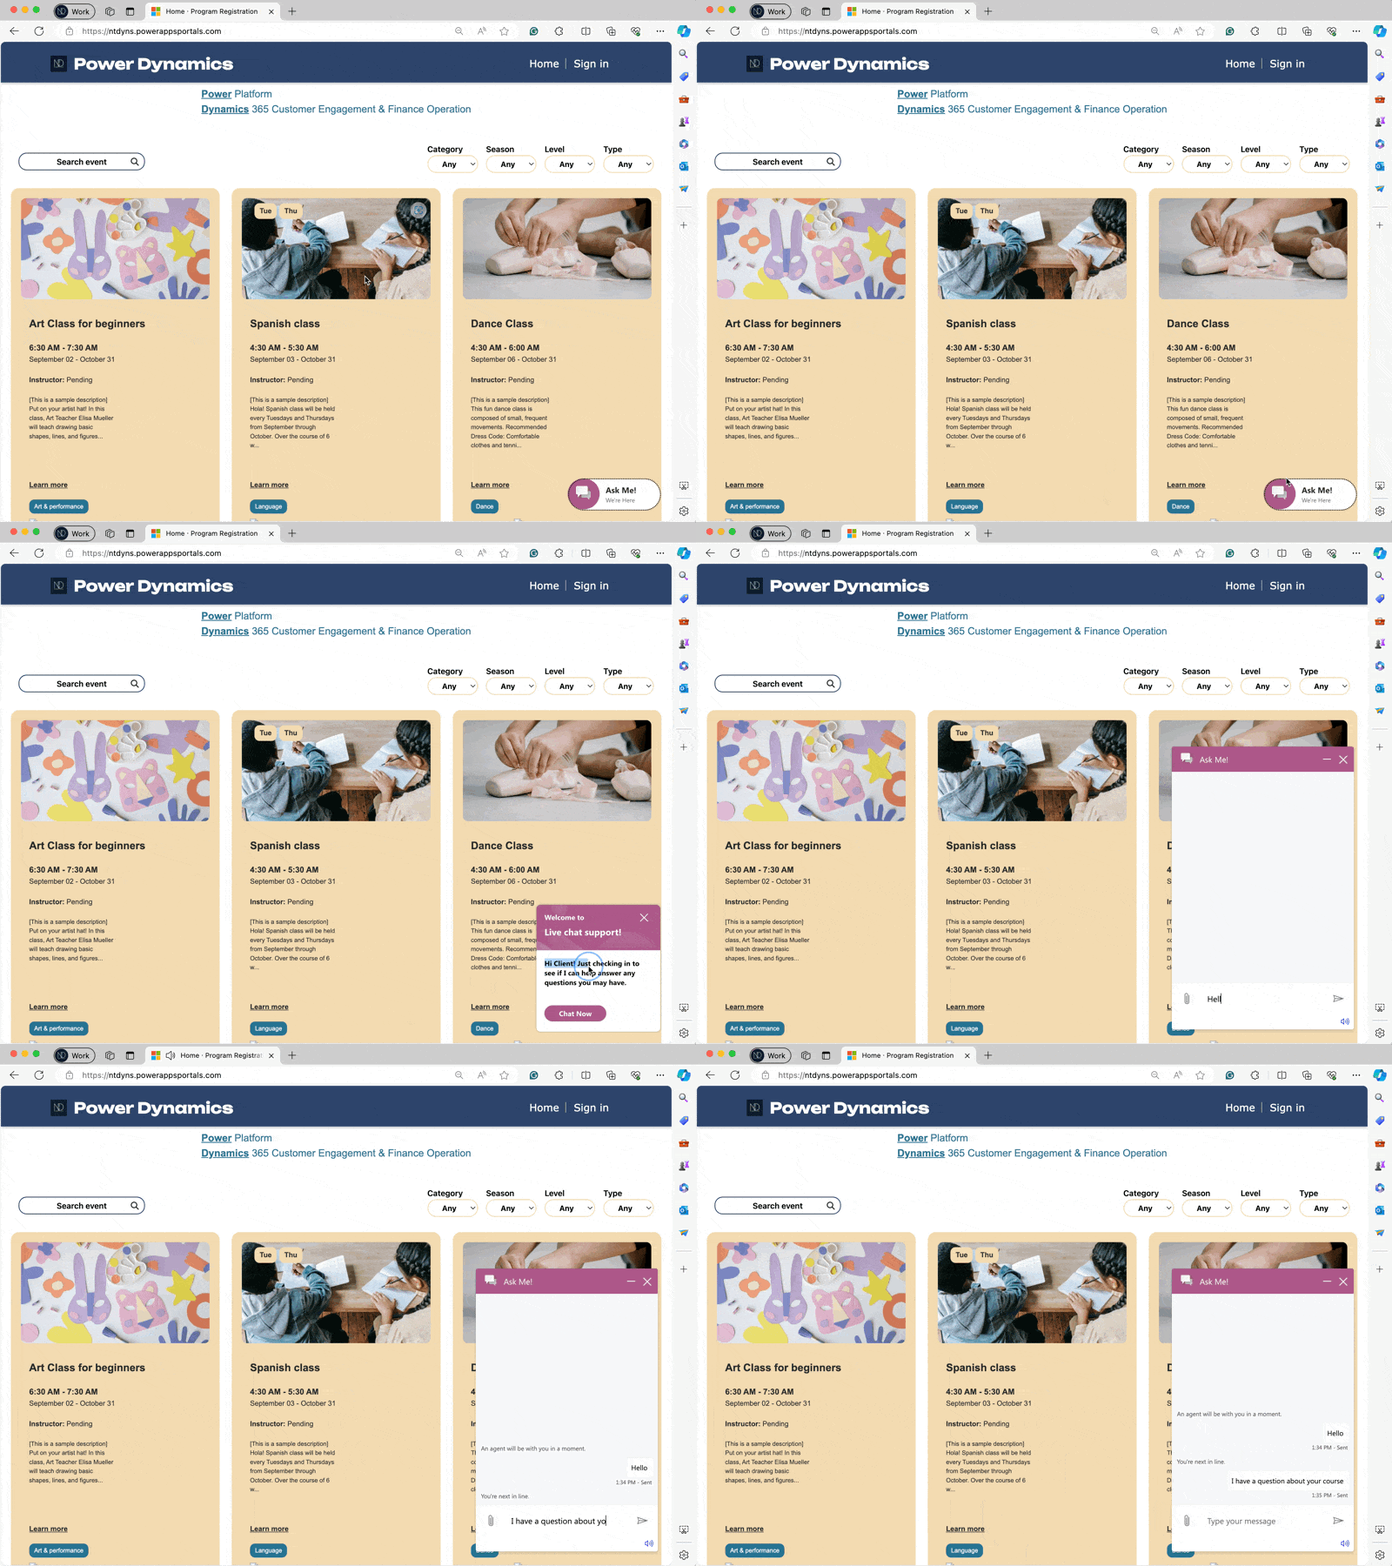
I will open my Power Page and test now\...

<figure><img src="/files/L7jP751mE5HWZ6AfCIW5" alt=""><figcaption><p>Proactive Chat - Testing</p></figcaption></figure>

Thank you for watching and Hoping well! :tada:\
\&#xNAN;**\[NTD]yns.asia**


---

# Agent Instructions: Querying This Documentation

If you need additional information that is not directly available in this page, you can query the documentation dynamically by asking a question.

Perform an HTTP GET request on the current page URL with the `ask` query parameter:

```
GET https://dyns.ntd.asia/power-dynamics/d365-ce/customer-experience/contact-center-omnichannel/add-chat-widget-to-power-pages-proactive-chat.md?ask=<question>
```

The question should be specific, self-contained, and written in natural language.
The response will contain a direct answer to the question and relevant excerpts and sources from the documentation.

Use this mechanism when the answer is not explicitly present in the current page, you need clarification or additional context, or you want to retrieve related documentation sections.